Give us this day our daily bread — and a good starter is what every household needs to make it!
First of all, we all need to understand one basic thing: there’s no need to ever buy bread from the shops when you know how to make your own. It’s very easy to make a nice loaf of bread and should never cost you more than $1 when you add up all the basic contents that go into a nice, simple loaf. There’s no need to pay $5 or more for a loaf of artisanal bread from your local market when you can learn how to make an even better loaf at home… and you don’t need that $300 bread machine either!
First, a bit of history: Wheat has been a staple in the human diet for over 10,000 years and evidence of wheat cultivation can be dated back to 9,000 BC in the Levant or what is now known as Iraq. Prior to this wild wheat, emmer and barley were used to make primitive breads. It was when early hunter/gatherers learned to grind wheat and other cereal grains that our love of bread was born. Farmed in the Levant and in the Nile Delta, wild emmer was the first cereal grain to be domesticated. Being a coarser and heavier grain, it would have produced a very filling and unleavened loaf in it’s time.
As farming of wheat continued throughout history preferred strains would be favoured and cultivated eventually leading to what it is we bake with today. The use of yeast in bread-making was something that came along much further in the evolution of bread. Ancient egyptians were the first to ferment dough and bake leavened loaves in clay ovens as opposed to over fires or hearths.
Our ancestors didn’t have quick-rise yeast packets at their disposal so they had to find more creative methods to make a leavened loaf of bread. This starter is a simple Lievito Madre or Mother Yeast similar to that which our foremothers and forefathers would have used when creating their daily bread.
Sourdough Starter – Biga or Lievito Madre
Making your own starter for the first time may seem like a daunting task but it’s not, it just requires you to pay attention to it during the first few days. A starter can take 2 to 5 days to cultivate depending on the temperature inside your home. Follow these easy steps, keep an eye on the little fella, and you should have a very successful starter that will serve you well for years to come! After you have created this starter, maintaining it should be fairly easy as you take from it and feed it week by week as you bake.
So here we go!
Preparation
- 2 cups whole wheat flour
- 2 cups of grapes (rinsed)
- 2 cups of tepid water
- Cheesecloth
Step 1. Rinse the grapes thoroughly and tie them into a cheesecloth pouch. In a bowl, smash them gently with your palm or fist and drain out the liquid, keeping the must and pulp inside the cloth. Drain the excess liquid by giving the pouch one last squeeze and then place it into a stainless steel or ceramic container containing the flour. Add the tepid water and mix it with the flour, burying the pouch of grapes in it. Cover with plastic or a lid and leave it sit in a warm place for 1 to 2 days. I placed my container in a cupboard above the refrigerator where it was warm but not too warm. Note: I also found it important to keep the container as air-tight as possible. If you do not have a lid for the container, make sure the plastic wrap is sealed on the container tightly.

Step 2. Check on your starter. After a day or two you are going to notice some changes: small bubbles may begin to form and the top of the plastic or lid may begin to bevel outwards as gasses are produced inside the container. When the starter has begun fermenting and bubbles appear, pull the grape pouch out and dispose of them. Have a quick look at the starter to make sure there is no white fuzz or black mould forming: this will occur if air comes in contact during the start-up phase or if the starter has been left too long unattended. If you have fuzz or mould on the surface, throw it out and go back to Step 1.
After you remove the grapes, pour the mixture into a fresh, clean container and feed your starter with 1/2 cup of flour and 1/2 cup of tepid water. Give it a stir, cover it again and put it in the cupboard for another 1 to 2 days.
Step 3. Check on your starter again. At this stage you may start to see hooch forming on the top, a dark boozy liquid that smells strong and is quite normal to the process. Don’t, however, get it into your mind that you can sip the stuff and have a kitchen-party with it; the migraines that may result will not be worth the trouble. Just stir the hooch back in to the starter and let it do its job… *hick*. Note: If you find hooch or a liquid layer forming on the top of your starter, top it off with 1/4 cup of flour. I find that it means the mix needs a bit more to eat! The starter will usually react by becoming active again if you do this.
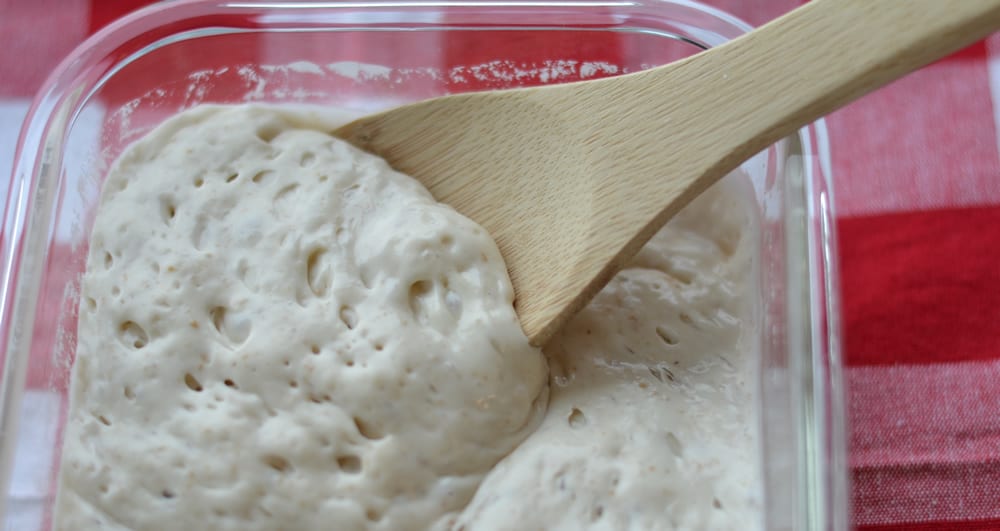
Step 4. After 4 to 5 days you should be seeing significant growth and bubbles forming, like in the photo below. The starter is now ready for use.

Step 5. Store it in the refrigerator from now on. When using it to bake, if you use one cup of the starter for your recipe always put in what you take out: One cup of starter out=1 cup of flour and 1/2 cup tepid water put back in. 2 parts flour and one part water seems to make a good consistency when feeding. Note: You should always have at least 2 cups of starter on reserve. When using the starter for baking pull it out of the fridge the night before baking to make sure it is active and at room temperature when placed into the baking mix. Store the starter in your fridge in a fresh, clean container after every use.
Important! Don’t forget to feed your starter after every use! To keep the yeast growing, it needs fresh flour and water to eat. As it eats, it produces more bubbles and gas, just like a baby! In fact, I was told by a good friend of mine in Rome, Angelo the baker, that you should really treat your starter like a living thing and give it a name. It needs to be loved and fed and kept alive, after all! So I went ahead and named my starter ‘Angelo’. I figured that if I named it, chances are I wouldn’t kill it by neglecting it! What will you name your starter, I wonder?
Bread recipes using this starter will follow in the weeks to come if you’d like to see how I incorporate it into my loaves.
Buon Appetito! Good eating to you…
Please feel free to leave comments or suggestions about this recipe below.


